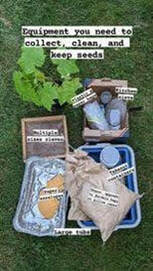
 Humans have a long history with seed collection – our agricultural systems are based on growing and collecting seeds. Seed collection and cleaning can be a meditative process, making us calm, happy, and relaxed. In late July we held a native seed scouting workshop hosted by seed collection expert Stefan Weber from Carolinian Canada Coalition. Stefan shared his knowledge with 40+ participants who will use these new skills to collect native wildflower seed and expand or create new pollinator habitat across Hamilton. We’ve summarized all the main tips and tricks below! Getting Started Plants are unique and complex. Different species have different seed collection times, storage requirements, and planting needs. You will need to research the species you are interested in beforehand – when are the seeds ripe, how will you need to store them, do they require stratification or scarification, etc.? Looking up as much information ahead of time will help to avoid unpleasant surprises and potential disappointments like under ripe, moldy seeds! Ethical Seed Collection When you engage in seed collection to grow native plants you are a steward of the land. You are responsible for conducting yourself and your seed collection pursuits in an ethical, ecologically-friendly way. 1. Landowner Permission Prior to collection, you need to get explicit permission from the landowner to collect seed. Seed collection is typically prohibited in national and provincial parks along with non-profit or private natural areas. Public access to natural spaces does not mean we can take from these areas. 2. Only Collect 10% of Available Seed Best practice is to collect only 10% of available seed from a wild population. By removing only a small random portion of the seeds and leaving the rest you are helping to preserve the genetic diversity of the population, allowing the plants to replace themselves, and ensuring the population is healthy enough to harvest from the following year. And be mindful – if you notice seed has already been collected from that site, find another population to harvest that year. * Home gardens are very different from wild populations. You can harvest as little or as much as you like from your personal planted population. If you’re planning to collect from your own garden, don’t deadhead! It will promote more flowers throughout the growing season but it cuts off the seed head and you’ll have no seeds to collect. Equipment Seed collection does not need to be an expensive venture. You can find most, if not all, of the equipment listed below in your home. Here are the basics for seed collection:
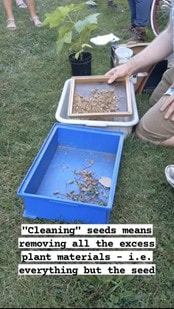
Collection, Cleaning & Storage You’ve done your research, have all your equipment, and are standing in front of your chosen plant. Before you jump into the rhythmic process of harvesting seed heads, conduct a quick ‘cut test’ to determine if the seeds are ready to collect. Ripe wildflower and grass seeds will be hard, dry, firm, and white or straw-coloured like nuts. If it does not look like this, it is not ready to be collected. Crumbly and dark? No good. Gooey or sappy? Under ripe! If the seed heads are damp or wet they can be left in the paper or fabric collection bag to dry, or spread out on a flat surface if they are densely packed. Once they’re dry you’re ready to clean. Seed cleaning means that you are removing all of the debris from the seed. You can start by shaking the bag around to dislodge the seeds from the seed heads, or pouring them out into a tub and massaging them with your hands. Make sure you know what your seed looks like and how big it is, you don’t want to discard them by accident! Once the seeds are separated from the seed heads you can run everything through several decreasingly-sized sieves – you keep what falls through the sieve and discard anything that stays on top. When you think you can’t remove any more debris gently blow across the seeds to remove the smallest bits. Store your cleaned seeds in a paper envelope or plastic/glass container with the species, date, and collection location clearly marked (you will thank yourself later!). Each species needs its own pre-treatment method prior to being sown - i.e. stratification and scarification. In nature these are things like seasonal changes and digestion. Google is your best resource to determine what species needs what treatment! You many need to leave your seeds in the fridge for a few weeks or months for them to be able to germinate. Or you might find yourself using sandpaper to wear down the outer protective layer. Enjoy exploring the wonderful world of native plants and seed collection!
1 Comment
9/21/2022 04:47:01 am
collecting seed is a good habit you use that collected seeds to put in your garden and grow a tree which helps to improve the atmosphere me myself love gardening a lot i like to put different types of plants in my backyard garden.
Reply
Leave a Reply. |
Archives
December 2023
Categories |
|
|
Butterflyway Hamilton: www.facebook.com/butterflywayhamilton/
Environment Hamilton: https://www.environmenthamilton.org/ Hamilton Naturalists' Club: https://hamiltonnature.org/ |

 RSS Feed